Installing Subspace
Getting started requires just a couple, easy steps. You'll be playing spaceship hockey in no time!
📥 Downloading the Game Client
You can download Subspace Continuum from one of the following locations:
- Steam Store
- Direct Download Link (Recommended)
The installer is very small — just 4.7MB — so it should download quickly on most internet connections.
Once downloaded, run the installer and follow the prompts. This will install the Subspace Continuum game client, which is what you'll use to connect to our zone.
⚠️ Note: The client looks old-school — and that’s because it is! But don’t worry. We’ll guide you through what really matters to get you started and playing.
⚙️ First-Time Setup
To start, launch the game client.

On the main menu screen, click "Profile"
It will lead you to the following page:

Fill in the form:
- Profile Name: This is only visible to you in your client.
- Player Name: This is the name that will appear in-game as your username.
- Password: Choose one and remember it!
The rest of the information under 'Profile' are just user-specific settings that you might want to play around with. Test out some resolutions, see what works best for you!
If you try to login with a user name that is already taken, you will receive a warning box that looks like this:

All this means is that, unfortunately, the user name you are trying to login with has already been claimed. You simply need to go back to 'Profile' and change your 'Player Name' to one that is not in use.
🛠️ Updating the Directory Server Address List
Subspace is made up of many Zones. The active Zones are listed in green on the main menu. Each Zone usually has a theme related to its name (for example: Star Wars Zone). Zones have different settings, weapons, objectives and styles of gameplay.
How to Update Your Zones
- Click on the Zones button in the main menu of the client.
- At the bottom of the window that comes up, look for Directory Server Address List.

Make sure this field contains:
sscentral.sscuservers.net; sscentral.trenchwars.org
Click Download under Download New Zones.
You should now see zones populate in the list. Look for: SSCE Hockey/Football Zone
Once you see it, double-click it to enable it.
🖐️ What if That Doesn’t Work?
You can also add the zone manually as a custom entry if needed.
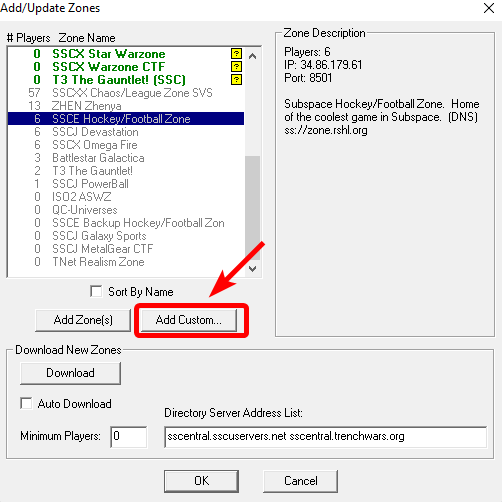
➕ Adding the Zone Manually
Click the Add Custom button. Enter the following details:
Zone Name: SSCE Hockey/Football Zone
IP Address: 34.86.179.61
Port: 8501
Click OK, and the zone will now appear in your list.
🚀 Joining Hockey Zone For The First Time
Congratulations, you're now ready to join the server.
- Select SSCE Hockey/Football Zone from the main menu.
- Click "Play".
The game will now download any zone-specific files it needs, like sounds, graphics, or settings. This usually only takes a few seconds depending on your internet connection.
🔊 Optional: Download the Sound Pack
To enhance your experience, you can install the official Hockey Zone Sound Pack, which includes:
- Music
- Crowd cheers
- Announcer calls
While optional, it does bring a more immersive atmosphere into the game when you can hear the crowd roar when you score a goal or the announcer yell "Close call!" or when a ref plays an intermission song.
In order to install, simply extract the contents of the zip file into your C:\Program Files (x86)\Continuum\sound folder. Make sure that you accept to override files if it prompts you to.
That's all there is to it!
If you encounter any issues while installing the game, you're always welcome to ask for help on our Discord!